
Six categories cover almost every roadside problem you’ll hit on two wheels: tire puncture repair, bike-specific fastener tools, a compact driver, multi-tool, holding and backup tools, consumables and spares, and a small human safety kit. Build a compact on-bike kit around those categories first, then keep a fuller garage kit at home for real maintenance. A mobile kit covers the ride-ready side, and a larger set handles everything else.
TL;DR:
- Carry tire repair tools suitable for your tire type, including plugs and inflators for tubeless and patches for tube tires, to fix flats quickly.
- Use a minimal set of fastener tools focused on your bike’s specific sizes, such as metric sockets, a T-handle, and a bit driver, to reduce weight and complexity.
- Keep essential consumables like zip ties, duct tape, spare fuses, and a master link in a labeled pouch for quick roadside repairs and long-term reliability.
- Build your toolkit by first performing a bolt size survey on your bike, then matching your tools to these sizes to avoid unnecessary bulk.
- Organize the tools logically by problem type, practice mock repairs at home, and perform pre-ride checks to ensure your kit is effective and ready to use.
Table of Contents
- Building Your Core On-Bike Tool Kit
- The Expanded Garage Kit For Real Maintenance
- Fixing a Flat: Tire Repair and Inflation Options
- Small Parts That Save the Ride: Consumables and Spares
- Matching Your Toolkit to Your Bike’s Actual Fasteners
- Packing and Practicing So the Kit Actually Works
- Why Professional-Grade Tools and Organization Matter
- What I’d Tell a Rider Building Their First Kit
- Which Teng Tools Kit Matches Your Riding Style
- A Few More Places to Check Before You Ride
- Sources
- FAQ
Building Your Core On-Bike Tool Kit
Your on-bike kit has one job: get you rolling again after a roadside problem, not perform a full service. That means every item earns its spot by weight, by usefulness, or both. A commercial roadside kit built around this philosophy commonly weighs about 1 pound and packs into roughly an 8 x 4 x 3 inch pouch, so there’s no excuse for skipping the essentials to save space.
Tire puncture items come first. A flat tire strands more riders than any other single failure, and it’s the one problem you genuinely cannot ride away from. Pack a plug kit for tubeless tires, a valve core removal tool, a mini inflator or a handful of CO2 cartridges, and a small pressure gauge. If your bike runs tube instead of tubeless tires, swap the plug kit for tube patches and tire irons, since plugs don’t work on a tube.
Fastener tools come next, and they need to match your specific bike. A folding hex (Allen) key set handles most bodywork, lever, and mirror bolts. Add a small selection of sockets sized to your bike’s axle nuts, and a mini T-handle or compact ratchet to drive them. AdvRider’s field-tested approach recommends wrenches in the 8mm to 19mm range as the practical spread most riders actually use, plus a stubby combination wrench or two for spots where a socket won’t reach.
A compact driver rounds out the fastener side of things. Look for a bit driver that swaps between JIS (Japanese Industrial Standard), Phillips, flat, and Torx heads rather than carrying four separate screwdrivers. JIS screws look like Phillips but have a different profile, and using the wrong driver on a JIS head is one of the fastest ways to strip a screw on a Japanese bike.
Multi-tool and pliers deserve more thought than most riders give them. Skip the bargain-bin multi-tool with fifteen gimmick functions and a pair of pliers that flex under real pressure. A quality pair of pliers with a wire cutter handles zip ties, bent brackets, and stuck cables, and it will outlast a cheap all-in-one tool that rounds off after a few uses.
Here’s the compact checklist to build from:
- Tire plug kit with reamer and insertion tool
- Valve core tool and a spare valve stem
- Mini inflator, CO2 cartridges, or a hand pump
- Small tire pressure gauge
- Folding hex key set (metric)
- Bike-specific socket set (2 to 4 sizes) with a T-handle or mini ratchet
- Stubby combination wrench (1 to 2 sizes)
- Compact bit driver with JIS, Phillips, flat, and Torx bits
- Quality pliers with wire cutter
- Small adjustable wrench or vise grips for backup grip
- Small flashlight or headlamp
- Basic first-aid item (gauze, adhesive bandages)
Holding and backup tools matter more than riders expect. A small pair of vise grips or an adjustable wrench can substitute for a missing socket size in a pinch, but use them carefully. Vise grips can chew up a bolt head if you clamp down too hard, so treat them as a last resort rather than a primary tool.
The human kit is easy to forget until you need it. A flashlight or headlamp turns a dark roadside repair from guesswork into a real job, and a small first-aid item covers minor scrapes from a repair gone sideways. None of this weighs much, but all of it matters when you’re stuck on the shoulder after dark.
The Expanded Garage Kit For Real Maintenance
Your on-bike pouch handles emergencies. Your garage kit handles maintenance, and it needs more range and leverage than anything you’d carry on the bike. RevZilla’s breakdown of a home shop setup separates these categories cleanly: shop manual, combination wrenches, sockets, torque wrench, screwdrivers, pliers, hex wrenches, and incidentals each play a distinct role, and that separation is worth copying.
Start with a 3/8-inch drive socket set, a full ratchet, a couple of extensions, and a matching set of combination spanners. This is your workhorse combination for wheel bolts, engine covers, and most fasteners you’ll touch during routine service. Add a torque wrench. Overtightened fasteners strip threads and crack cases; undertightened ones vibrate loose on the highway. A breaker bar earns its keep on stubborn axle nuts and anything that’s been torqued down tight at the factory.
Specialty items fill the gaps a general socket set can’t reach:
- Spark-plug socket sized to your specific plug (many bikes use 14mm, 16mm, or 21mm depending on engine)
- Chain tools for breaking and riveting a new link
- A paddock stand or motorcycle jack for wheel-off work
- Digital multimeter for electrical diagnosis
- Battery maintainer to keep the battery healthy between rides
- Chain brush and a drain pan for cleaning and oil changes
A spark plug socket sized correctly for your engine saves you from the classic mistake of using a standard deep socket that cracks the plug’s porcelain insulator. If your bike uses an unusual plug depth or reach, a T-bar spark plug socket in 14mm, 16mm, or 21mm gives you the leverage a standard ratchet can’t in tight valve covers.
Jalopnik’s list of core owner tools backs this same split, calling out a torque wrench, digital multimeter, and battery maintainer as items every owner should have at home, even riders who don’t do their own major service.
What stays home and why? Weight and complexity are the two filters. A full 3/8 inch socket set with extensions adds bulk you’ll never use on the shoulder of a highway. Specialty pullers, torque wrenches, and anything with a learning curve belong in the garage, where a mistake costs you time instead of stranding you sixty miles from the nearest town.
Fixing a Flat: Tire Repair and Inflation Options
A flat tire is the single most common reason riders call for a tow, and it’s also the most fixable roadside problem if you’re carrying the right gear. The choice between a plug kit and tube patches depends entirely on your tire type: tubeless tires take a plug, while tube-type tires need a patch kit and tire irons because a plug won’t seal inside a tube.
Inflation is where riders overthink things. A small 12 volt compressor gives the most reliable, repeatable fill and works for multiple flats if you’re unlucky enough to get more than one. CO2 cartridges inflate almost instantly but you’re limited to however many cartridges you packed, and a busted seal wastes one fast. A hand pump works every time with zero consumables, but it’s slow and it’s real work after a long day of riding. Bikes & Bays notes that many overlanders default to a compact 12V compressor specifically because it removes the “how many cartridges do I have left” math from the equation.
Here’s the roadside procedure, start to finish:
- Stabilize the bike on the side stand or center stand, well off the roadway, and use hazard lights if you have them.
- Locate the leak. Look for the nail, screw, or object still lodged in the tread; if you can’t see one, listen and feel around the tire for escaping air.
- Ream and plug the hole using your plug kit’s insertion tool, pushing the plug fully into the puncture.
- Re-inflate with your compressor, CO2, or hand pump, checking pressure as you go rather than guessing.
- Verify pressure with a gauge before riding, and check again after a few miles once the plug has had time to seat.
Carry a spare valve stem and a valve core tool alongside your plug kit. A slow leak at the valve stem itself is a different repair entirely, and no plug kit fixes a bad valve.
Pro Tip: Ride the first few miles after a plug repair well under highway speed. A fresh plug needs time to seat fully, and a blowout at 70 mph is a far worse problem than the flat you just fixed.
Small Parts That Save the Ride: Consumables and Spares
The items that actually get you home after a breakdown are rarely the tools themselves. They’re the small, cheap consumables that hold something broken together long enough to reach a shop.
Zip ties in two or three sizes handle everything from a dragging fender to a loose wiring harness. Duct tape, wrapped flat around an old gift card to save space, fixes torn luggage, cracked fairings, and temporary hose leaks. Hose clamps and a length of bailing wire cover jobs zip ties can’t, like reattaching an exhaust bracket that’s vibrated loose.
Carry a spare master link matched to your chain’s exact size and pitch. AdvRider’s field kit guide specifically calls out the master link and spare fuses as items riders forget until they need them, and a snapped chain with no spare link means you’re not riding anywhere. Pack a small assortment of spare fuses matched to your bike’s fuse box and one or two spare bulbs if your bike still uses conventional bulbs rather than LEDs.
A few small containers, even old prescription bottles or film canisters, keep loose bolts and washers from disappearing into the bottom of your tank bag. A small tube of blue threadlocker prevents vibration from walking bolts loose on longer rides, and a steel epoxy syringe can patch a small crack in a case or bracket well enough to limp home.
Keep this list together in one labeled pouch:
- Zip ties (small, medium, large)
- Duct tape (flat-wrapped)
- Hose clamps and bailing wire
- Spare master link (matched to your chain)
- Spare fuses (matched to your fuse box) and 1 to 2 spare bulbs
- Small containers for loose hardware
- Blue threadlocker
- Steel epoxy syringe
Label the pouch clearly and check it every few months. Fuses and bulbs are easy to grab for a home repair and forget to replace.
Matching Your Toolkit to Your Bike’s Actual Fasteners
Every bike uses a different mix of fastener sizes, and an off-the-shelf kit rarely matches yours exactly. The fix is a fifteen-minute audit you do once, then reference for years.
Walk your bike with a small notepad and check the axle nuts, caliper bolts, sprocket bolts, seat bolts, and any bodywork fasteners you’d realistically need to remove on the road. Write down each size as you go. Most riders are surprised to find their bike uses only four or five distinct sizes across every fastener that matters for a roadside repair.
A common starting set covers 8mm, 10mm, 12mm, 14mm, and 17mm, which handles the large majority of fasteners on most Japanese and European bikes. Bikes & Bays found that a T-handle carrying 8mm, 10mm, 12mm, and 14mm sockets alone covers the majority of common roadside tasks on many production bikes, which tells you how far a genuinely minimal kit can go. Add Torx sizes if your bike uses them for bodywork or brake components, and check for imperial sizes if you ride anything with aftermarket parts or older British or American iron.
To minimize what you carry, favor a T-handle over a full ratchet and socket set. A T-handle applies more consistent torque with one hand, works in tighter spaces, and weighs less than a ratchet plus a case of sockets. Pair it with folding bits for your driver instead of loose screwdrivers rattling around in your kit.
- Perform a one-time bolt survey and write every size on an index card
- Tape or laminate that card and keep it in your kit permanently
- Start with 8, 10, 12, 14, and 17mm sockets
- Add Torx sizes only if your bike actually uses them
- Choose a T-handle over a full ratchet set to cut weight
A realistic on-bike tool kit built this way typically weighs a few kilograms for adventure-style setups, according to Bikes & Bays’ overlanding checklist, and a street-focused kit can weigh meaningfully less. If your pouch is pushing past that, you’re probably carrying tools duplicated in your garage kit or sizes your bike doesn’t even use.
Packing and Practicing So the Kit Actually Works
A kit you’ve never opened is a liability, not a safety net. Organization and practice matter as much as the tools themselves, and both are free.
Organize by problem, not by tool type. Group everything into a flat-tire module, a fastener module, and an electrical module, rather than dumping every wrench in one pocket and every consumable in another. When you’re kneeling on gravel with a flat tire, you want one pouch, not a search through five compartments.
A tool roll works well for fastener tools since it keeps each item visible and separated. A small hard case protects delicate items like your pressure gauge and multimeter from getting crushed under other gear. Modular trays, the kind that click together and let you customize each section, keep everything organized without letting small parts migrate into the wrong compartment. Put your most-used items, tire gauge, plug kit, hex set, on top or in the most accessible pocket, since you’ll reach for those far more often than a spare fuse.
- Group tools by problem type: flat tire, fastener, electrical
- Use a tool roll for fasteners, a hard case for delicate gauges
- Place high-frequency items (gauge, plug kit) on top for fast access
- Store your fastener size cheat sheet with the kit itself
Practice matters more than most riders admit. Pull your kit out at home and run through a mock flat repair, timing yourself. Note where you fumbled, where a tool wasn’t where you expected, and rearrange accordingly. A rider who’s practiced the routine once at home will beat an unpracticed rider carrying twice the tools, every time, because confidence under pressure comes from repetition, not inventory.
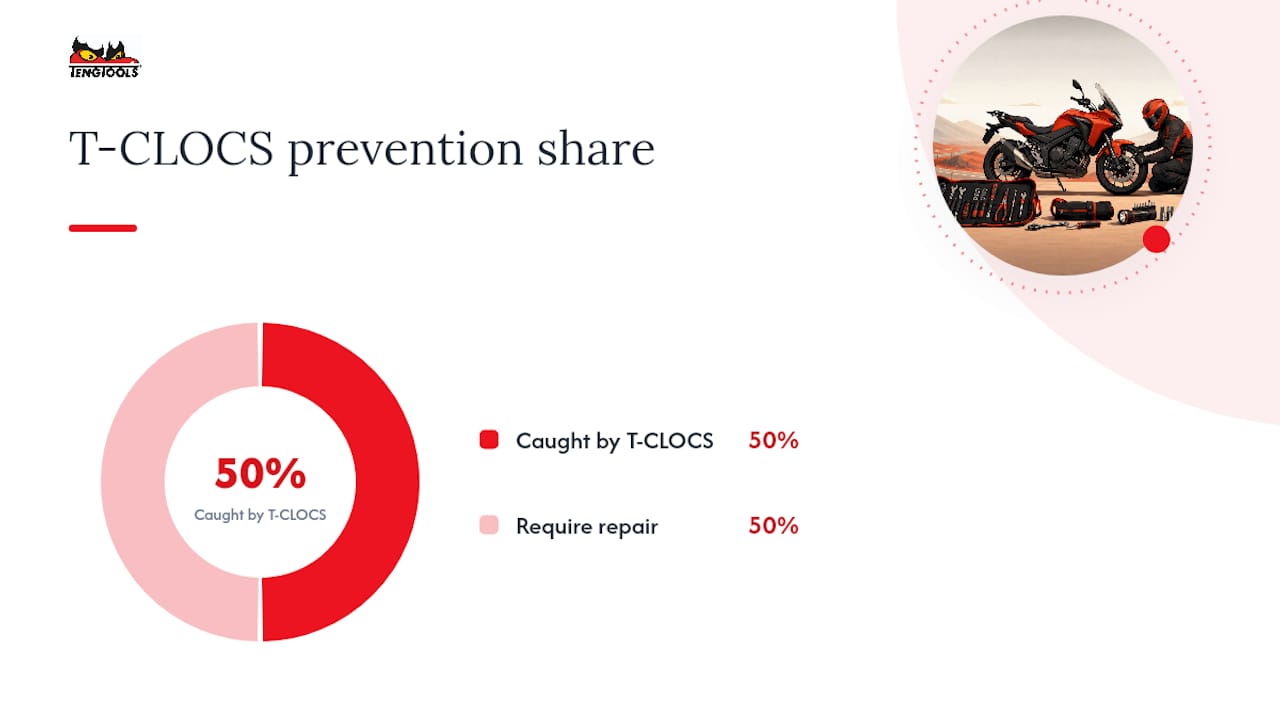
Before you even need the kit, a quick T-CLOCS-style check (Tires, Controls, Lights, Oil, Chassis, Stands) before each ride catches half the problems that would otherwise strand you. Prevention beats repair, and a five-minute walk-around costs you nothing.
Pro Tip: Time your mock roadside repair with a stopwatch on your phone. If a simple flat takes you longer than 15 minutes at home in good light, it’ll take twice that on a dark shoulder in the rain.
Why Professional-Grade Tools and Organization Matter
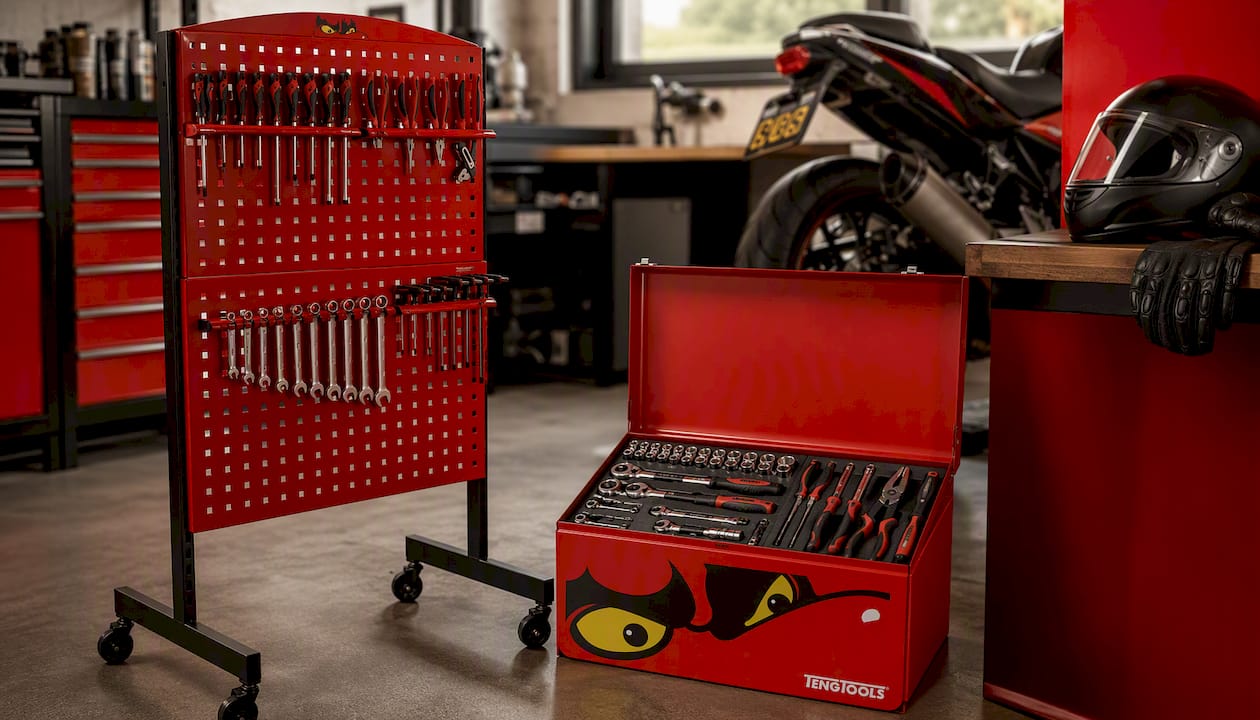
Some professional hand tools have been designed with a system that gives each tool a designated spot in a customizable tray so a quick glance tells you if something’s missing before you’re stranded roadside wondering where your valve core tool went.
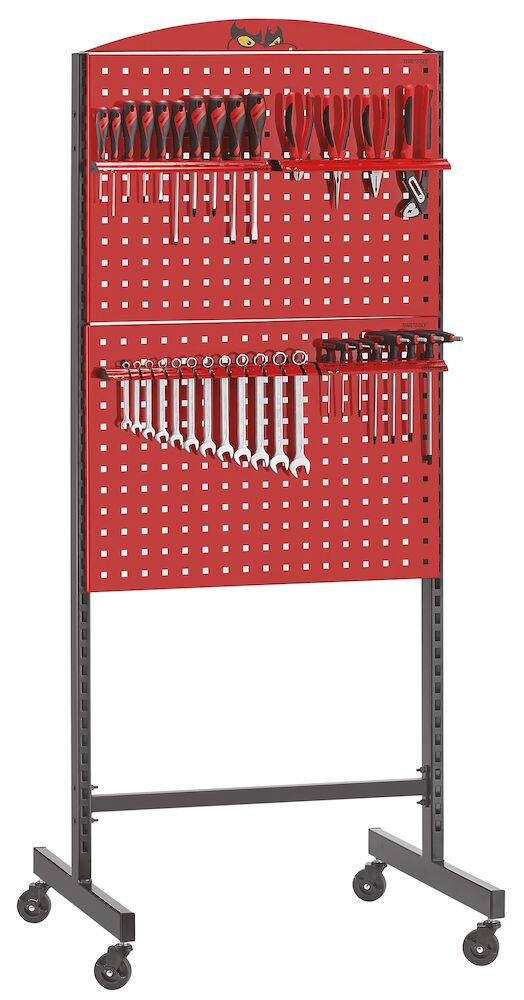
That organization only matters if the tools themselves hold up. The catalog of professional hand tools is built to meet certain international standards for dimensional accuracy and material strength, important for maintaining bolt integrity under torque. Every tool typically comes with a lifetime warranty, and some orders ship same-day from a Texas warehouse.
Mapped to the categories covered above, three kits fit three different rider profiles: a compact mobile kit for commuters or short-tourers, a mobile tool panel for weekend riders wanting a modular, pannier-friendly layout, and a large kit covering full garage needs with sockets, wrenches, and specialty items for home maintenance.
A tool that isn’t where you expect it, mid-repair, on the shoulder of a highway, costs you more than the ten seconds of searching. It costs you the confidence that the rest of your kit is complete too.
What I’d Tell a Rider Building Their First Kit
Most new riders build their kit backward. They buy a 200 piece mega-kit online, stuff it under the seat, and never look at it again until something breaks, at which point they discover half the sockets are wrong sizes for their bike anyway. Start with prevention instead. A five-minute T-CLOCS check before you leave the driveway prevents more breakdowns than any tool you could carry.
Quality beats quantity every time. A handful of sockets and a driver you’ve actually practiced with will get you home faster than a sprawling multi-tool with a plastic hinge that snaps the first time you lean on it. Cheap tools round off bolts and fail exactly when torque matters most.
Write your bike’s fastener sizes on an index card and keep it with the kit permanently. It takes fifteen minutes once and saves you from guessing at sizes with cold hands in bad light for the rest of the time you own the bike.
— David
Which Teng Tools Kit Matches Your Riding Style
If you’re commuting or doing short weekend rides, the Teng Tools Mobile Tool Kit, 36 Pieces gives you compact, bike-specific coverage without adding bulk to your tail bag.
If you ride longer weekend trips and want tools organized in a way you can grab mid-repair without digging through a bag, the Teng Tools Mobile Tool Panel, 33 Pieces fits into a pannier and keeps every tool in its own labeled spot. And if you’re the rider who does your own oil changes, chain adjustments, and valve checks at home rather than paying a shop, the Teng Tools 1033 Piece Tool Kit covers the garage side of this list in one purchase, sockets, wrenches, and specialty tools included, all backed by a lifetime warranty and shipped same-day from Texas.
The honest way to decide is by looking at how you actually ride. Commuters and short tourers should start with the compact kit and add garage tools as maintenance needs grow. Weekend adventure riders benefit most from the modular panel’s organization. Riders who wrench at home regularly get the most value from the full garage set. Check out the complete Teng Tools kit lineup to compare pieces, storage format, and price before you order.
A Few More Places to Check Before You Ride
- Consult your bike’s Haynes manual for exact torque values and fastener types before you tighten anything critical.
- AdvRider’s on-the-bike toolkit thread offers field-tested advice from long-distance riders on sizing and spares.
- RevZilla’s Common Tread guide breaks down a full garage build on a modest budget.
- Bikes & Bays’ overlanding checklist covers weight targets and module-based packing for longer trips.
Sources
- 10 Essential Tools Every Motorcycle Owner Should Have
- Build an on-the-bike toolkit and use it
- The Ultimate Off-Road Motorcycle Tool Kit: A Trailside Spares Checklist for Long-Distance Overlanding
- Assembling a motorcycle maintenance tool kit for less than $500
FAQ
What should be in a motorcycle tool kit?
A solid on-bike kit covers six categories: tire puncture repair, bike-specific fastener tools, a compact driver, quality pliers, holding tools like a small adjustable wrench, and consumables like zip ties, spare fuses, and a master link.
What are the essential tools to have on a motorcycle?
The non-negotiables are a tire plug kit with inflator, a folding hex set, a few bike-specific sockets on a T-handle, quality pliers, and a small pressure gauge, backed at home by a torque wrench and full socket set for real maintenance.
What are 10 must-have motorcycle accessories for a roadside kit?
Beyond tools, pack zip ties, duct tape, a spare master link, spare fuses, a valve core tool, hose clamps, bailing wire, a small flashlight, threadlocker, and a basic first-aid item.
What is the 12 second rule on a motorcycle?
The 12 second rule is a scanning habit, not a tool checklist: riders scan roughly 12 seconds ahead on the road to spot hazards early enough to react safely, which reduces the odds of the sudden stops and swerves that cause dropped bikes and roadside damage.
Should I buy a prebuilt motorcycle tool kit or build my own?
A prebuilt kit like the Teng Tools Mobile Tool Kit gives you a solid starting base, but always audit it against your specific bike’s fastener sizes and add any spares or consumables it’s missing.