
For shallow drawers, a lay-down foam tray beats vertical holders every time. For portability, rail clips win. For high-density storage in a deep drawer, custom-drilled hardwood or a honeycomb foam layout packs sockets very efficiently into limited space. Every other option is a trade-off between visibility, speed, and how often you’re hauling the set out of the shop.
TL;DR:
- Modular foam tray systems are more adaptable to evolving socket collections than fixed layouts, making them ideal for shops with growth or changing needs.
- Using precise measurements, such as a 0.05 inch gap for drilled holes and N42 grade magnets, significantly improves socket security and ease of access.
- Rail clips excel in portability and transportation between locations, while molded trays offer faster identification for stationary setups.
- Building with durable materials like 3/4 inch hardwood and Kaizen foam ensures longevity and prevents damage during active use or transport.
- Budget-friendly options, such as upcycled containers and magnetic strips, are effective temporary solutions until a permanent setup is established.
Table of Contents
- 12 Socket Organizer Ideas Worth Trying
- How to Build a Foam Shadow Board for Sockets
- Rail Clips vs. Molded Trays: Which One Fits Your Shop?
- Building an Angled Wooden Socket Carrier
- Drawer Layout, Grouping, and Labeling That Actually Works
- Materials, Clearances, and Sizing Rules Before You Build
- Why Modular Foam Trays Solve the Lost-Socket Problem
- Customizing Organizers for 1/4", 3/8", and 1/2" Drives
- Keeping Sockets Secure During Transport
- Adding Extensions, Ratchets, and Accessories to Your Layout
- Budget Builds and Upcycled Socket Storage
- The Editorial Take: Stop Chasing the “Perfect” System
- Get the Kits That Match These Organizer Builds
- Sources
- FAQ
12 Socket Organizer Ideas Worth Trying
There’s no single “best” layout for every shop. Experienced mechanics generally choose based on priorities like portability, drawer depth, or wanting an instant visual inventory, and that’s the right way to think about it before you buy foam or fire up a drill.
Here are 12 approaches worth considering, with a quick note on where each one shines:
- Foam shadow boards — best for instant visual inventory; you see a gap the second a socket goes missing.
- Lay-down trays — best for shallow top drawers where vertical clearance is tight.
- Rail/clip systems — best for portability and moving sets between toolboxes.
- Magnetic trays — best for keeping loose sockets from sliding during transport.
- Angled wooden carriers — best for readability; the 45-degree face puts every size stamp at eye level.
- Honeycomb drilled boards — best for high density when you’re mixing deep and standard sockets.
- Pegboard posts — best for wall-mounted overflow storage outside the drawer.
- Portable rail carriers — best for field techs and mobile mechanics.
- Segmented drawer inserts — best for keeping SAE and metric sets physically separated.
- Foam-lined trays — best for cushioning impact sockets and preventing chrome scratches.
- Wall-mounted posts — best for freeing up drawer space entirely.
- Labeled shadow boards — best for shared shops where more than one person pulls tools.
Pick the one that matches your actual constraint, not the one that looks best on a shelf. A shop that shares tools among three techs needs labeling more than it needs density. A mobile mechanic needs rails more than a wall post.
How to Build a Foam Shadow Board for Sockets
Kaizen-style closed-cell foam is the standard here because it peels in clean, predictable layers and resists shop oil, which regular craft foam doesn’t do.
Materials: two-layer or three-layer Kaizen foam sheet sized to your drawer, a fine-tip marker, a snap-off utility knife, and optionally a hot-wire cutter for cleaner perimeters on curved sockets.
- Lay your sockets out in the order you want them and trace each outline with the marker.
- Score the top layer with the utility knife, following the traced line at a slight inward angle.
- Peel the top layer inside each traced shape to expose the contrasting color underneath.
- Add a small finger-pull notch to each cutout so sockets lift out without prying at the foam edges.
- Glue the assembled foam into the drawer with spray adhesive, or add a thin non-slip liner underneath if you want it removable.
Pro Tip: Use a bright underlayer color, like orange or yellow, under a black top sheet. A missing socket becomes impossible to miss at a glance, which is the whole point of a shadow board.
Leave extra depth in the cutouts for impact sockets. They’re longer than chrome sockets of the same size, and a shallow cutout will leave them sitting proud of the foam.
Rail Clips vs. Molded Trays: Which One Fits Your Shop?
Rail and clip systems hold sockets on a metal or plastic bar with spring-loaded clips, and they exist for one reason: portability. You can pull the whole rail out, walk it to a job, and snap it back into a drawer or a tool bag without dumping loose sockets everywhere. Roundup testing consistently ranks rail systems highest for transport, while tray-style organizers score better for labeling and identification speed.
Molded trays work differently. Each socket drops into a shaped slot, often with color-coded rings marking SAE versus metric sizes, and a magnetic base keeps the whole tray from sliding around a metal drawer liner.
- Choose rails if you regularly move sockets between a toolbox, a cart, and a truck bed.
- Choose molded trays if the set lives in one drawer and speed of identification matters more than mobility.
- Avoid bargain-bin plastic clips. Cheap rail clips are a known failure point, and users report them snapping or losing tension within months of daily use.
- Look for aluminum rails or reinforced polymer clips if the set travels daily.
Building an Angled Wooden Socket Carrier
A carrier angled at roughly 45 degrees puts every socket’s size stamp in your direct line of sight instead of hidden on top. Builders using this angle report much better readability than flat, upright holders, but the angle also shifts the center of gravity forward, which is where tipping problems start.
- Build the base from 3/4 inch hardwood. Thinner stock flexes and tips far more easily in a moving toolbox.
- Drill holes sized about 0.05 inches larger than each socket’s outside diameter for a snug but removable fit, ideally with a Forstner bit on a drill press for a flat, clean bottom.
- Embed rare-earth magnets, commonly N42 grade, in countersunk pockets behind each socket position to hold it against the angled face.
- If sockets still lean forward or fall in a shallow drawer, add a second magnet per socket or switch to a thicker base before assuming the design has failed.
Pro Tip: A rubber drawer liner under the carrier stops the whole block from sliding when you slam the drawer shut, which is usually a bigger problem than the magnets themselves.
Drawer Layout, Grouping, and Labeling That Actually Works
Group by drive size first (1/4 inch, 3/8 inch, 1/2 inch), then arrange by ascending size within each group. Put your most-used sizes, usually 10mm, 13mm, and 1/2 inch, in the prime real estate closest to your hand, not buried in a back corner because they happened to fit there.
- Use a staggered or honeycomb layout when mixing deep-well and standard sockets; this pattern can cut footprint by about 20% compared with a straight linear rail.
- Keep deep sockets in their own row or section rather than interleaved with standard depth, since mixed rows waste vertical clearance.
- Label with a paint pen for a quick DIY fix, an etched plate for something permanent, or high-contrast stickers if you want to swap layouts later.
- Check the tray weekly. A one-minute visual sweep catches a missing 1/2 inch socket before it becomes a mystery three jobs from now.
A lay-down organizer solves most of this automatically for shallow drawers, since the horizontal layout gives you a top-down map of every size at once.
Materials, Clearances, and Sizing Rules Before You Build
Measure before you cut anything. Take your drawer’s interior depth, measure your tallest socket (impact sockets are usually the longest), and leave at least 1/4 inch of clearance above it so the drawer closes without binding.
- Use 3/4 inch hardwood, Baltic birch plywood, or red oak for angled wooden carriers. Anything thinner tends to flex or crack around drilled holes.
- Use Kaizen foam for tray builds since it resists oil exposure and peels in consistent layers.
- Use heavy-duty plastic or aluminum for rails and clips; avoid thin injection-molded plastic that cracks under repeated flexing.
- Use N42 or stronger rare-earth magnets for holders, and seal exposed wood with polyurethane or tung oil to resist shop grime and moisture.
Reported build failures almost always trace back to skipping one of these three checks: undersized clearance, wood too thin, or magnets too weak for the socket weight.
Why Modular Foam Trays Solve the Lost-Socket Problem
Tengtoolsusa builds its Get Organized™ system around exactly the shadow board principle covered above, except the trays click together instead of requiring a utility knife and an afternoon. Each foam tray has a designated cutout per tool, so a missing socket is visible from across the shop, not discovered mid-job.
The trays are designed in Sweden and built to ISO and DIN standards, with a lifetime warranty backing the tools that live in them. Shops running multiple techs benefit most: modular trays let you pull one tray for a mobile job and leave the rest of the set intact, which solves the exact transfer problem that pushes people toward rail systems in the first place. Same-day shipping from the Fort Worth warehouse means a replacement tray or missing piece doesn’t stall a job for a week.
Customizing Organizers for 1/4", 3/8", and 1/2" Drives
Mixing drive sizes in one tray is the fastest way to end up with a drawer that looks organized but wastes half its space. A 1/4 inch drive socket set needs cutouts roughly a third the diameter of a 1/2 inch set, and cramming both sizes into a single row of evenly spaced holes leaves the small sockets rattling around loose.
The cleaner approach is dedicating a distinct zone, row, or tray to each drive size. If you’re building a foam shadow board, cut all 1/4 inch sockets into one contiguous block, 3/8 inch into a second, and 1/2 inch into a third. That keeps the visual scan simple: you always know which section holds which drive, even before you read a single size stamp.
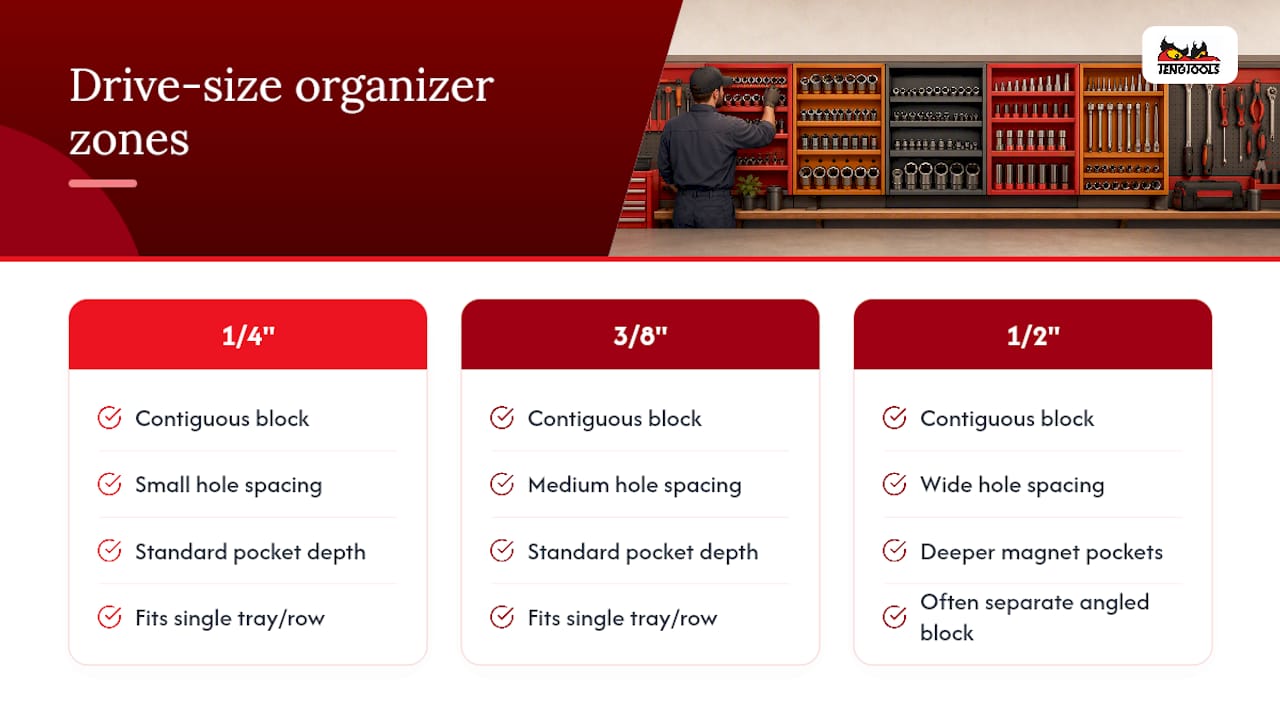
For wooden carriers, this often means building separate angled blocks rather than one wide board, since 1/2 inch sockets need noticeably deeper magnet pockets and wider hole spacing than 1/4 inch sockets do. Trying to standardize hole spacing across all three drive sizes usually means the small sockets get too much room and the large ones get too little.
If your collection spans all three drives, a stacked modular tray system solves the sizing mismatch better than a single custom board. Each tray is sized once for its own drive, and you can add or remove a tray as your 3/8 inch or 1/2 inch collection grows, instead of rebuilding an entire fixed layout from scratch.
Keeping Sockets Secure During Transport
A socket organizer that works perfectly sitting still in a drawer can fail completely the moment it goes in a truck bed. Vibration and sudden stops are the real test, and it’s a test most upright holders fail.
Magnetic bases are the simplest fix for tray-style organizers. A tray that sits loose on a metal shelf will slide and spill the moment you brake hard; a magnetic base keeps it locked in place even over rough terrain. For foam shadow boards, the fix is different: friction and cutout depth do the work instead of magnets, so cutting sockets in a bit deeper than the minimum snug fit pays off any time the organizer travels.
Rail and clip systems are built specifically for this problem, which is why mobile mechanics tend to default to them. The spring tension in each clip holds the socket against lateral movement, and the whole rail locks into a bracket rather than sitting loose. Cheap clips are the weak point here. Brittle plastic clips lose spring tension over time and let sockets bounce free, which is exactly the failure mode reported in long-term socket organization builds.
If your set rides in a bag rather than a fixed tray, add a zippered or snap-closed cover over the tray face. It adds one extra second to access, but it’s the difference between sockets arriving where you left them and finding half of them loose in the bottom of a bag.
Adding Extensions, Ratchets, and Accessories to Your Layout
A socket organizer that ignores extensions, adapters, and ratchets forces you to hunt through a second drawer for the tool that actually drives the socket. Building accessory space into the same layout saves real time on every job.
The simplest fix is a dedicated foam channel running along one edge of the tray, sized for your extension bars and universal joints. Cut it as a single long slot rather than individual cutouts. Extensions vary less in diameter than sockets do, so one channel usually handles the whole range.
For ratchets, a wooden carrier can include a wider, deeper cutout at one end sized for the ratchet head, with the handle resting in an open channel alongside the socket rows. This keeps the ratchet you actually use with that drive size instead of stored separately.
Rail systems handle this well too, since most rail brackets accept an adapter clip sized for a ratchet head or a driver bit holder, letting you extend the same rail instead of building a second storage solution. If you’re running a modular tray stack, dedicate one tray entirely to accessories, extensions, adapters, and a couple of frequently used ratchets, rather than trying to squeeze them into the same tray as the sockets themselves. It keeps the sizing logic clean and makes the whole stack easier to scan.
Budget Builds and Upcycled Socket Storage
You don’t need a table saw or a sheet of Kaizen foam to get organized this week. Plenty of workable solutions start with things already sitting in a garage.
An old ice cube tray or a divided tackle box works surprisingly well as a temporary lay-down organizer for a small 1/4 inch set. The compartments are usually close enough to socket-sized that minimal trimming gets you a functional layout in ten minutes.
A cardboard box lid, lined with a strip of adhesive-backed felt, makes a passable drawer liner that at least stops sockets from rolling and clanging every time you open the drawer. It won’t last as long as foam, but it costs nothing and buys time until you build something permanent.
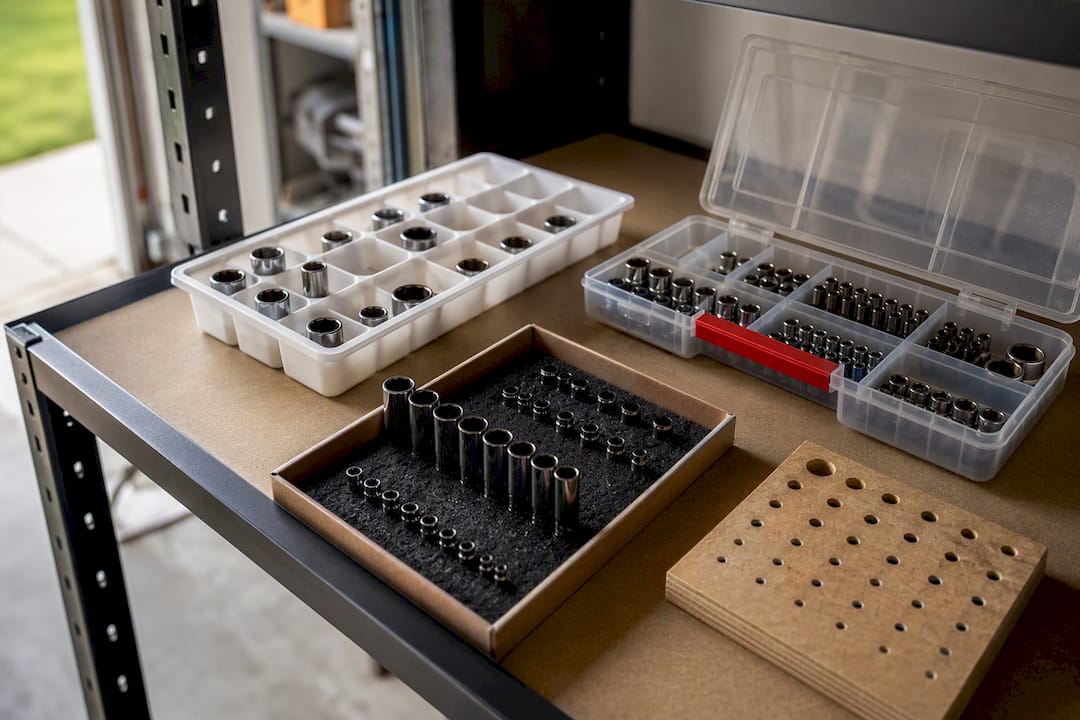
Magnetic knife strips, the kind sold for kitchens, mount to a pegboard or wall stud and hold small to mid-size sockets in a single visible row for almost no cost. It’s not a drawer solution, but it clears drawer space fast if wall real estate is available.
Scrap plywood works fine for a first-attempt angled carrier if you’re not ready to commit to hardwood. Drill your holes, test the fit, and upgrade to Baltic birch once you know your spacing and angle are right. The point of a budget build isn’t permanence. It’s proving the layout works before you invest in materials that last.
The Editorial Take: Stop Chasing the “Perfect” System
Most articles on this topic try to crown one organizer as universally best, and that’s the wrong frame entirely. The research is clear that priorities differ by shop, and the honest answer is that a mobile mechanic and a home garage hobbyist should build completely different systems, not variations of the same one.
Where conventional advice falls short is the sizing detail. Plenty of guides tell you to “leave clearance” or “use a strong magnet” without giving you a number. A 0.05 inch tolerance on drilled holes and an N42 magnet grade aren’t trivia. They’re the difference between a carrier that holds sockets securely and one you rebuild in three months.
If you’re starting from zero, prioritize measurement before materials. Know your drawer depth, your tallest socket, and your drive size mix before you buy foam or wood. A modular system, whether you build it yourself or start from a stackable foam tray set, beats a fixed layout every time your collection grows, and it always grows.
— David
Get the Kits That Match These Organizer Builds
Building a shadow board or angled carrier from scratch is satisfying, but if you’d rather start with a set already sized for foam-tray organization, Tengtoolsusa sells exactly that. The Teng Tools Socket Set 1/4" & 3/8" FOAM6X6 113 Pieces comes pre-fitted to a foam tray, so the drawer layout and grouping work covered above is already done for you.
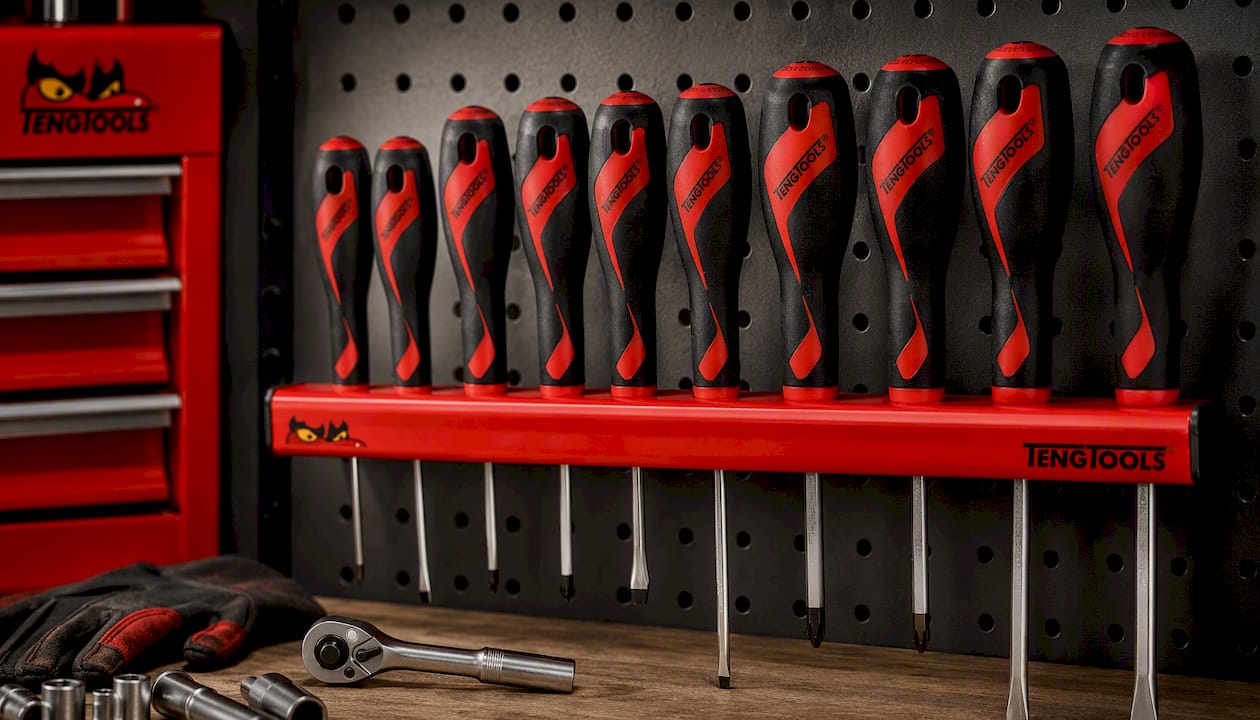
If your shop runs a mix of drive sizes, the Teng Tools Socket Set 1/4" & 1/2" FOAM6X6 76 Pieces gives you a slimmer alternative that still snaps into a modular tray stack. Pair either set with the Teng Tools Screwdriver Set Wall Rack 10 Pieces if you’re moving accessories to a wall mount and freeing up drawer space entirely. Every set ships same-day from the Fort Worth warehouse and carries a lifetime warranty, so building your organizer around it means you’re not rebuilding the foam layout every time a socket goes missing. Browse the full lineup at Tengtoolsusa and match a kit to the drawer you’re working with today.
Sources
- What Is The BEST Way To Organize Sockets? – Humble Mechanic
- Best socket organizer – BobVila
- Engineerskill
- Custom socket storage idea – ToolGuyd
FAQ
What is the best way to organize sockets?
There’s no single best method. Choose a lay-down foam tray for shallow drawers, rail clips for portability, or a honeycomb foam layout for high-density storage, based on which constraint matters most in your shop.
What is the best socket set organizer?
For most shops, a modular foam tray system, like Tengtoolsusa’s Get Organized™ trays, beats a fixed layout because you can add or swap trays as your collection grows instead of rebuilding the whole drawer.
How can I build my own socket organizer?
Trace your sockets onto Kaizen foam, peel the top layer to create shadow cutouts, and secure the tray with spray adhesive or a non-slip liner. For a wooden version, drill holes 0.05 inches larger than each socket and embed N42 magnets at a 45-degree angle for readability.