
Organize your tool chest by frequency of use: daily tools live at waist height, weekly tools sit in the middle drawers, and specialty or heavy items go at the bottom. This is the single rule that fixes most disorganized chests, and it works better over time than sorting tools by project or category because your jobs change but your reach habits don’t.
You can start seeing results this afternoon. Try these three moves before you do anything else:
- Empty your top drawer completely and wipe it down.
- Add a non-slip liner so tools stop sliding when the drawer moves.
- Take a photo of the layout once you’ve sorted it, so you have a reset reference later.
Technicians who organize by frequency of use rather than by project kit report faster workflow and fewer lost tools, mainly because project-based systems fall apart the moment the job list changes. A frequency zone doesn’t.
Key Takeaways
A frequency-first layout, tested before you commit to foam and backed by a daily put-back habit, keeps a tool chest organized for years instead of weeks.
| Point | Details |
|---|---|
| Zone by frequency, not project | Daily tools go in the Golden Zone drawer, weekly tools in the middle, bulky items at the bottom. |
| Prototype before cutting foam | Test a layout with cardboard or temporary liners for at least a week before committing to foam. |
| Keep drawers under 80% full | Overpacked drawers slow access and leave no room for the tools you’ll add later. |
| Photograph and label every drawer | A photo reference plus exterior labels makes resetting a disturbed drawer a thirty-second job. |
| Teng Tools implements the system directly | The TCW707K cabinet and FOAM4X4 kit map straight onto the zones and shadow-foam method described here. |
Table of Contents
- Step-By-Step Setup: How to Organize Your Tool Chest Drawer By Drawer
- Drawer Zoning and the Golden Zone: Mapping Tools to Your Chest
- Choosing Organizers: Liners, Foam, Dividers, and Rails
- Fixing the Socket Drawer and the Wrench Rack for Good
- Labels, Photos, and the 10-Second Reset Test
- Maintenance: The Daily Habit and the Quarterly Audit
- How Teng Tools’ Get Organized™ System Puts This Into Practice
- Reclaiming Vertical and Wall Space Around Your Chest
- Organizing Power Tool Accessories: Bits, Blades, and Batteries
- Ergonomic Considerations for Your Tool Chest Layout
- Materials and Finishes That Hold Up Over Time
- Customizing Your Chest for Your Trade
- Get Your Chest Organized With the Right Cabinet and Foam Kit
- Sources
Step-By-Step Setup: How to Organize Your Tool Chest Drawer By Drawer
Rebuilding a chest from scratch feels bigger than it is once you break it into stages. Do this in order, one drawer at a time, and resist the urge to skip ahead to buying organizers before you’ve actually sorted anything.
- Measure and inspect each drawer. Note the depth, width, and whether the drawer glides cleanly at full extension. A drawer that sticks at 90% capacity will stick worse once you fill it.
- Pull everything out. Every wrench, socket, and mystery bolt goes on a table or tarp. You can’t design a layout around tools you can’t see.
- Sort into three piles: keep, repair, toss. Damaged sockets, cracked handles, and duplicate tools you never use get set aside. Be honest here; a broken ratchet taking up drawer space is dead weight.
- Group by frequency and task. Separate daily-use tools (the ones you touch on every job) from weekly tools (specialty sockets, less common wrenches) and infrequent or bulky items (specialty pullers, gauges, seasonal gear).
- Assign a role to each drawer before you buy anything. Sketch it out or just talk yourself through it: “top drawer is daily hand tools, second drawer is sockets, bottom drawer is power tool accessories.”
- Prototype the layout with cardboard or temporary liners. Lay tools in their planned spots and physically go through a few common jobs. Do you have to dig? Reach across the drawer? Adjust now, while it costs nothing.
- Install your chosen organizers (liners, foam, dividers, or rails) once the layout has proven itself for a few days.
- Test the drawer close. Overfilled drawers won’t seat properly and put stress on the slides. If a drawer doesn’t close flush, you’ve got too much in it.
- Iterate. The first layout is rarely the final one. Give it two weeks of real work before you commit to cutting foam.
This mirrors the approach outlined in RichXTop’s drawer organization guide, which treats organization as a repeatable process rather than a one-time weekend project. Professionals who prototype layouts in phases, working through one drawer before converting the whole chest, tend to avoid the expensive mistake of cutting foam around a layout that doesn’t actually hold up to real use.
Pro Tip: Don’t cut foam until you’ve used the temporary layout for at least a week of actual jobs. What looks efficient on paper often falls apart the first time you’re reaching for a 10mm under time pressure.
Drawer Zoning and the Golden Zone: Mapping Tools to Your Chest
The Golden Zone is the drawer range at roughly waist height, the spot you reach without bending or stretching. That’s prime real estate, and it should hold only the tools you touch multiple times a day. Everything else gets ranked by how often you actually need it, not by how it’s categorized in a catalog.
For a typical 5-drawer roller cabinet, a workable top-to-bottom assignment looks like this:
- Top drawer (Golden Zone): Daily hand tools, ratchets, most-used sockets, screwdrivers.
- Second drawer: Wrench sets, secondary sockets, pliers you use most days but not constantly.
- Third drawer: Specialty tools used weekly, torque equipment, diagnostic gear.
- Fourth drawer: Power tool accessories, bits, blades, less common attachments.
- Bottom drawer: Heavy or bulky items, large sockets, pullers, seasonal tools.
That bottom-heavy weight distribution isn’t just about convenience. Heavy tools sitting low keep the cabinet’s center of gravity down, which matters when you’re rolling a loaded chest across a shop floor or leaning on it while a drawer is extended. A top-heavy cabinet with dense tools stacked high is a tipping hazard waiting for the wrong angle.
Inside each drawer, layer frequency zoning with functional grouping. Your top drawer might hold daily tools, but within it, keep task sets together: the sockets and ratchet you use for oil changes stay adjacent, the screwdrivers you grab for trim panels stay in their own lane. This hybrid approach, frequency first, then function, cuts down on the mid-job drawer swapping that eats up more time than people realize.
One sizing rule worth committing to memory: avoid filling any drawer past about 80% capacity. A packed-to-the-edge drawer looks efficient until you try to pull a socket out without disturbing six others, and it leaves you no room to add tools as your kit grows.
Choosing Organizers: Liners, Foam, Dividers, and Rails
The organizer you pick should match the drawer’s job, not the other way around. Here’s how the main options actually compare in daily use.
Non-slip liners are the cheapest starting point and belong in every drawer regardless of what else you add. They stop tools from sliding when the cabinet rolls or a drawer opens fast, and they protect the drawer bottom from scratches and oil stains.
EVA and Kaizen foam (two-color shadow foam) give each tool a cut-out home, so a missing item is visible at a glance instead of discovered mid-job. Two-color foam works best in drawers holding precision tools you’ve already tested in a temporary layout, since cutting foam locks in your zoning decisions.
Plastic trays and bin inserts work well for small parts, fasteners, and anything that doesn’t have a fixed shape, where foam cutouts don’t make sense.
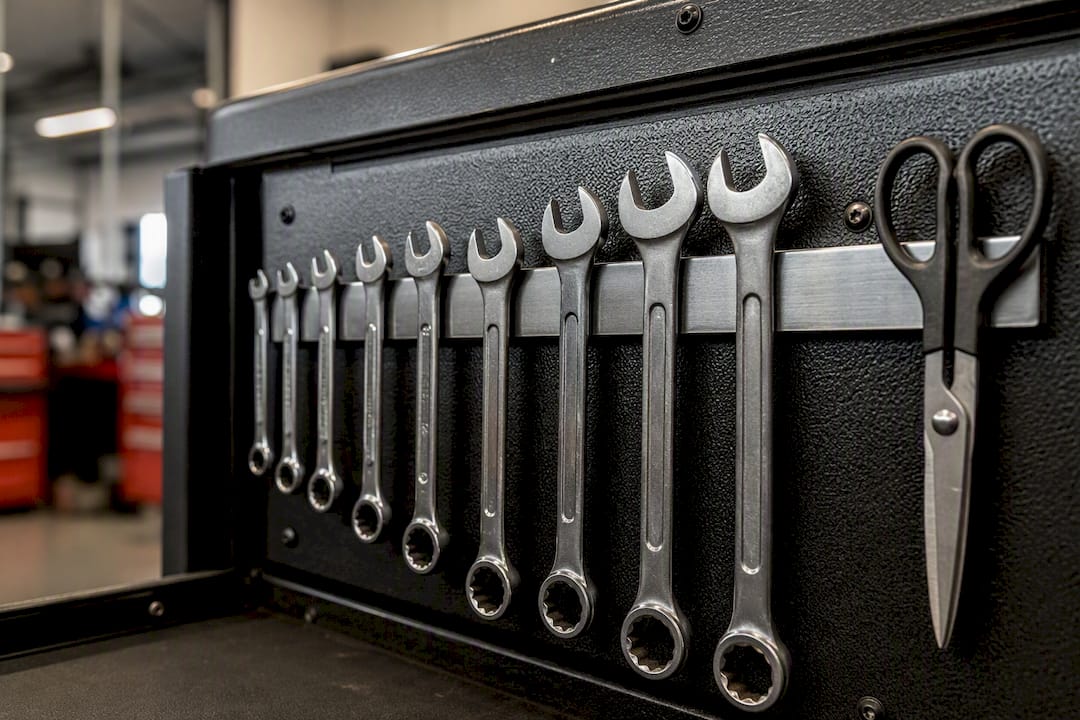
Socket rails, wrench racks, and magnetic strips solve the specific problem of tools migrating and stacking on top of each other. These fixtures improve visibility and cut down on tools sliding around when a drawer gets opened and closed dozens of times a shift.
A few practical notes on durability: foam holds up better against oil and solvent exposure than cardboard dividers, but cheap foam degrades and crumbles within a year or two, so buy from a supplier that sells replacement sheets. If you’re cutting your own foam, prototype the layout on paper first, test the pick-and-return motion for comfort, then cut only the top layer and peel it away to create the two-tone shadow effect.
Pro Tip: If you’re not ready to invest in a full foam system, cardboard dividers held together with packing tape will tell you almost everything you need to know about whether a layout works. Foam is the upgrade, not the starting point.
Fixing the Socket Drawer and the Wrench Rack for Good
The socket drawer is where most chests fall apart. Loose sockets roll, mix drive sizes, and turn a two-second grab into a thirty-second hunt. Fix it with a fixed sequence: organize by drive size first (1/4-inch, 3/8-inch, 1/2-inch), then split each drive group into metric and SAE, then separate shallow from deep sockets. Once that order is set, don’t deviate from it, even when you’re in a hurry to put tools back.
Wrench racks come in two basic styles: upright racks that hold wrenches on their edge, and flat trays with molded slots. Upright racks save drawer depth and make it easy to scan sizes at a glance, but they take up more vertical space, so they fit better in a taller drawer. Flat trays keep a lower profile and work well when drawer height is tight.
Small parts (screws, clips, sensors) need their own strategy entirely. Lidded bins keep loose hardware from migrating when the drawer slides; magnetic bowls are faster for anything ferrous you’re pulling in and out constantly; lift-out trays work well when you need to carry a subset of parts to the job instead of digging through a fixed drawer.
Labeling matters more here than anywhere else in the chest. Put size labels directly on socket rails, and use color or high-contrast tape on wrench slots so a mis-grab under time pressure becomes obvious before you’ve walked away from the drawer.
Labels, Photos, and the 10-Second Reset Test
A layout only stays organized if putting things back is faster than leaving them out. Three habits make that happen.
- Label the outside of each drawer. Printed label tape, laminated cards, or magnetic labels all work; pick whichever survives shop conditions best, since paper labels degrade fast near oil and coolant.
- Photograph each drawer once it’s set up. Shoot straight down, in consistent lighting, and save the photos somewhere you’ll actually check them. A photo reference makes resetting a disturbed drawer a thirty-second task instead of a guessing game.
- Run the reset test. Open the drawer, pull one tool, put it back exactly where it came from. If that takes more than a couple of seconds of thought, the layout needs adjusting.
Pro Tip: Shadow foam does the labeling work for you: an empty cutout is a visual alarm that something didn’t make it back. That’s worth more than any written label when you’re scanning a drawer at the end of a long day.
Maintenance: The Daily Habit and the Quarterly Audit
Organization decays without upkeep, but the upkeep itself is small if you build it into your routine instead of treating it as a separate task.
- Follow the put-away-now rule. Return a tool to its spot the moment you’re done with it, not at the end of the shift. This single habit, paired with labeling and a photo reference, does more to prevent tool loss than periodic deep cleans.
- Run a quarterly audit. Inspect for damaged foam, wipe down liners, and check whether any “weekly” tools have quietly become “daily” tools that deserve a better drawer.
- Plan for growth before you need to. Leave expansion room in secondary drawers rather than packing every inch, and know when your tool count has outgrown the cabinet you’re in.
- For shared tools, keep a simple checkout system. A shared checkout log, even a basic one like Findle Inventory’s approach to tracking tool custody, prevents the classic shop problem of tools disappearing into someone else’s box.
How Teng Tools’ Get Organized™ System Puts This Into Practice
The Get Organized™ system is built around the same zoning logic this article walks through: click-together foam trays that give each tool a fixed spot, so a missing item shows up as an empty cutout instead of a mystery. Instead of cutting foam freehand, you’re working with modular trays designed to interlock inside standard drawer dimensions.
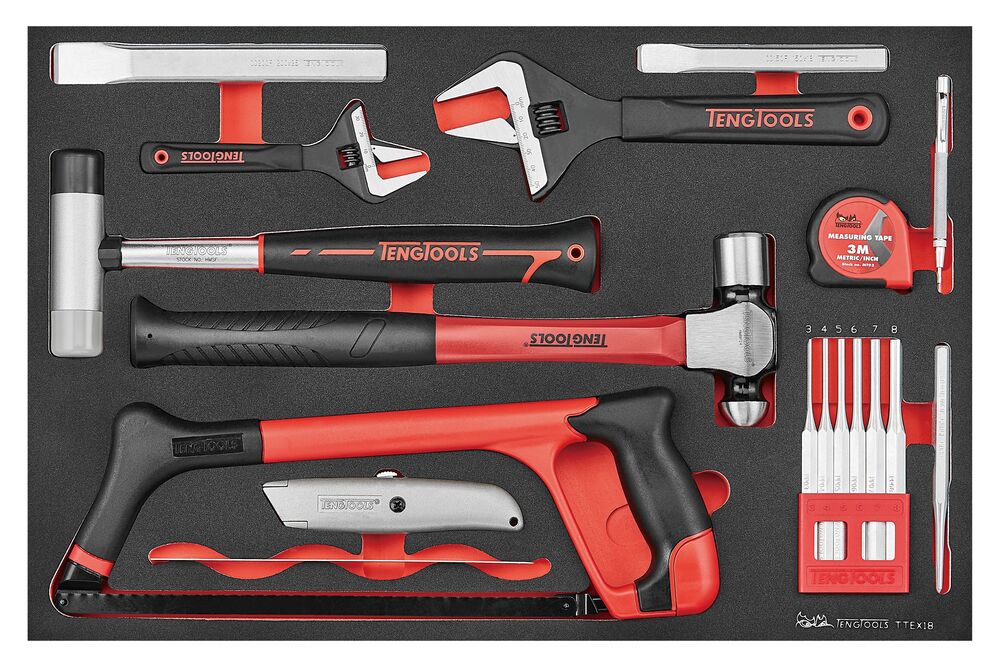
For a 5-drawer setup like the one outlined above, the trays slot directly into the frequency zones you’ve already mapped out: daily hand tools up top, sockets and wrenches in the middle, bulkier gear toward the bottom. That’s the same layout logic covered in Teng Tools’ guide to organizing mechanic tools, applied through a modular tray instead of a cut sheet of foam.
A few things back the system beyond the layout itself:
- Every tool in the range meets ISO and DIN standards, so replacement parts and sizes stay consistent across kits.
- A lifetime warranty covers the tools themselves, which matters when a drawer sees daily abuse for years.
- Same-day shipping from the Fort Worth, Texas warehouse means a missing tray or replacement piece doesn’t stall a job for a week.
Reclaiming Vertical and Wall Space Around Your Chest
A tool chest can’t hold everything, and trying to force it to just crowds your best drawers. Vertical space around the chest, and even inside it, does a lot of the heavy lifting once you stop treating it as wasted.
Inside the cabinet, the underside of the lid and the drawer side-walls are often left completely empty. A magnetic strip mounted on a side-wall holds pliers or screwdrivers without eating drawer floor space, and reclaiming that lid and side-wall real estate measurably increases pick speed and storage density compared to a chest that only uses flat drawer bottoms.
Outside the chest, pegboard or slat wall panels mounted behind or beside the cabinet handle the tools you use often but don’t need locked in a drawer: clamps, measuring tools, larger power tools waiting for their next job. This keeps your Golden Zone drawer reserved for genuinely daily items instead of getting crowded by things that are better off hanging in sight.
Lighting deserves a mention here too. Deep drawers and dim work bays hide small parts at the back of a drawer, and a strip of LED lighting along the underside of an upper drawer or shelf edge cuts down on the time spent squinting into shadows. It’s a small addition that pays for itself the first time you find a dropped fastener without a flashlight.
Treat wall storage and chest storage as one system, not two competing ones. If a tool doesn’t earn a spot in a frequency zone, it probably belongs on the wall instead of stuffed into an already crowded drawer.
Organizing Power Tool Accessories: Bits, Blades, and Batteries
Bits, blades, and batteries don’t behave like hand tools, and treating them the same way is how a drawer turns into a junk pile of driver tips and dead batteries within a month.
Bits sort best by type and size in a dedicated shallow tray, ideally near the top drawer since they’re pulled constantly during assembly or fastening work. Group by drive type first (hex, square, Torx) and then by size, the same logic used for socket organization.
Blades need edge protection as much as organization. Saw blades and cutting discs should sit in a slotted holder or their original cases rather than loose in a drawer, both to protect the cutting edge and to keep exposed teeth from damaging other tools nearby.
Batteries deserve their own zone, away from metal tools and ideally in a drawer with some ventilation. Storing batteries loose next to sockets or wrenches risks contact with metal and accelerates terminal wear; a dedicated tray or slotted battery organizer keeps charge levels visible and prevents that contact entirely. Chargers can live in the same drawer if space allows, so the whole charging kit moves as one unit.
A bit and blade drawer that’s packed solid today will be overflowing in six months as your collection grows.
Ergonomic Considerations for Your Tool Chest Layout
Ergonomics in a tool chest comes down to one question: how far does your body have to move to get a tool, and how often does it have to move that way? Every extra inch of reach or bend, repeated dozens of times a shift, adds up to real fatigue over a workweek.
The Golden Zone concept exists specifically to answer this. Tools used constantly belong at a height where you can grab them without bending your back or stretching above shoulder height, which for most cabinets lines up with the top one or two drawers. Tools used less often can sit lower or higher, since the ergonomic cost of an occasional reach is much smaller than a repeated one.
Drawer depth matters too. A drawer that’s too deep for its contents forces you to dig, while a drawer that’s overfilled forces awkward wrist angles to extract a single tool. This is part of why the temporary-layout testing step in the setup process matters: you’re not just checking whether tools fit, you’re checking whether reaching for them feels natural across a full range of common tasks.
Left-to-right placement inside a drawer counts as much as top-to-bottom placement across drawers. If you’re right-handed and constantly cross your body to reach a tool on the left side of a drawer, that’s a layout problem worth fixing, not a habit to just live with. Small adjustments here, made after a week or two of real use, are what separate a chest that feels effortless from one that just looks organized.
Materials and Finishes That Hold Up Over Time
The cabinet itself is part of the organization system, not just a box that holds it. Material and finish choices affect how well your layout survives years of shop use.
Powder-coated steel is the standard for a reason: it resists chipping and scratching far better than painted finishes, and it shrugs off the oil, coolant, and grime that accumulate on a working cabinet. Look for consistent coat thickness around drawer edges and handles, since those are the spots that take the most physical abuse from daily opening and closing.
Drawer slides matter more than most people check before buying. Ball-bearing slides handle full extension under load without sagging or binding, which protects both the organizers inside and the tools they hold. A slide that struggles under a fully loaded drawer will wear out fast and eventually throw off the whole layout you spent hours building.
Liners and foam should be chosen with chemical exposure in mind. Standard EVA foam holds up reasonably well against light oil contact, but constant solvent exposure degrades cheaper foam within a year or two. If your work involves heavy degreaser or brake cleaner use, budget for liner replacement as a recurring cost rather than a one-time purchase.
For maintenance guidance that keeps a cabinet’s finish and function intact, simple habits like wiping down liners and checking slide function during your quarterly audit do more for longevity than any one material choice.
Customizing Your Chest for Your Trade
A frequency-first layout is the foundation, but the details shift depending on what you actually do for work.
Automotive technicians typically need the deepest socket and wrench presence, with torque equipment and diagnostic tools in a dedicated weekly-use drawer. Mobile mechanics face an extra constraint: everything needs to survive transport and vibration, so liners and dividers matter even more than in a stationary shop cabinet.
Construction and trade work usually shifts more weight toward power tool accessories and fasteners, with hand tools playing a smaller role than they do for a mechanic. A carpenter’s top drawer might hold measuring tools and a few hand tools, while bits, blades, and fasteners take over the space a mechanic would give to sockets.
Electrical and low-voltage work calls for insulated tools kept in their own clearly marked zone, separate from standard hand tools, both for quick identification and to avoid mixing rated and unrated equipment under time pressure.
Whatever the trade, the underlying process doesn’t change: sort by how often you reach for something, test the layout before committing to foam, and adjust as the work itself shifts. A practical tool organization system built this way flexes with a changing job list instead of falling apart the first time your project mix changes.
The one change that pays off fastest
If you do nothing else this month, pick one drawer, sort it by frequency, add a liner, and photograph it. That single habit, label plus photo plus a strict put-back rule, fixes more disorganization than a full cabinet overhaul done once and never maintained. The photo gives you a reset point; the put-back rule keeps you from needing it.
Most technicians who stall out on organizing a chest do it because they try to fix all seven drawers at once. Start with the drawer you open the most. Everything else follows once that one habit sticks.
— David
Get Your Chest Organized With the Right Cabinet and Foam Kit
Everything in this guide comes down to two things: a cabinet with enough drawers to support real zoning, and a way to give each tool a fixed, visible spot. The Teng Tools 27" Classic Roller Cabinet 7 Drawers Red (TCW707K) gives you the drawer count to run the full frequency-first layout described above, from a Golden Zone top drawer down to a bottom drawer built for heavy, bulky tools.
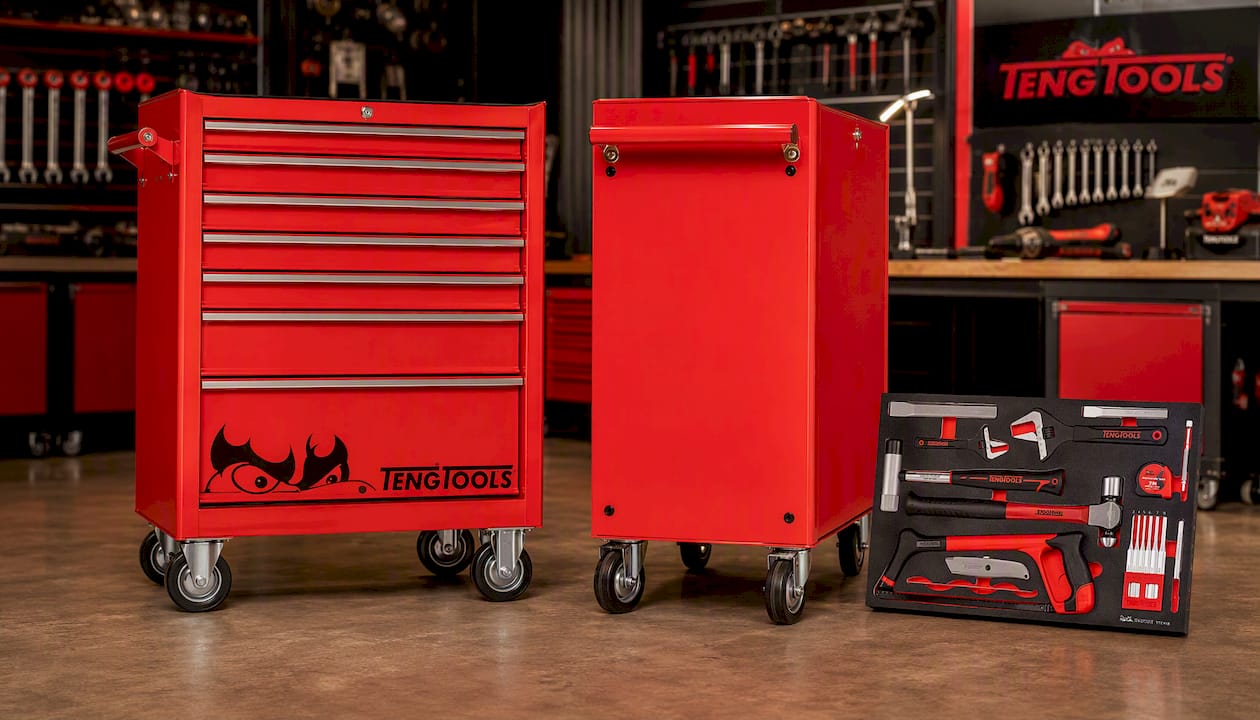
If mobility matters more than a fixed station, the preassembled castors version skips the setup work and rolls straight into your bay. And for your top drawer, the Teng Tools FOAM4X4 18-piece general tool set (TTEX18N) comes with shadow foam built in, so daily hand tools get a visible home from day one instead of waiting on a custom foam cut.
Measure your existing drawer space before ordering, especially depth and width, since a cabinet swap only pays off if the new drawers actually fit your shop layout. Check current availability and place your order through the links above.
Sources
- How to Organize a Tool Chest: The Complete 2026 Guide | The Tool Scout
- Tool Box Organizers – 19 Tips & Hacks for Your Tool Box | Creative Safety Supply
- Engineerskill
- How To Organize Tool Storage Drawers Like a Pro | RichXTop