
A shadow board marks the exact storage spot for every tool, so a missing tool is visible the second you glance at the board. That visibility cuts search time, keeps hazardous tools out of the wrong hands, and forces a tidier bench without anyone lecturing you about it.
For point-of-use stations, mount a vertical board. For rolling carts, drawers, or anything that gets bounced around a service van, use Kaizen or shadow foam inserts instead. Both approaches work. The right pick depends on whether you’re protecting fragile gear or just keeping a bench honest.
- Vertical boards: best for stationary benches and shared tool walls
- Foam inserts: best for drawers, cabinets, and mobile kits
- Start with a foam tray kit like the TELMD31 screwdriver set if you want a ready-made shadow system out of the box
Key Takeaways
A shadow board works because it turns a missing tool into something you notice in seconds, not something you discover mid-job.
| Point | Details |
|---|---|
| Match format to use case | Choose vertical boards for stationary benches and foam inserts for mobile kits or fragile instruments. |
| Build from real usage | Shadow only frequently used tools, sequenced by reach and workflow, not an exhaustive inventory. |
| Contrast drives detection | Two-tone foam or painted outlines make a missing tool visible at a glance, even across a room. |
| Sustain it daily | Run shift-start and shift-end checks, and update outlines the same day tools change. |
| Choose density and fit over price | High-density foam trays matched to your exact tool set, like Teng Tools’ Get Organized™ kits, hold up longer than generic cut trays. |
Table of Contents
- Vertical Boards vs. Shadow Foam Inserts: Which Fits Your Shop?
- What You Need: Materials, Mounting Hardware, and Accessories
- How Do You Design and Build a Shadow Board?
- Vertical Board or Foam Insert: How Do You Decide?
- Keeping the System Honest: Maintenance and Daily Checks
- Get Organized™: How Teng Tools Foam Trays Solve This
- Budgeting for a Shadow Board System
- Common Pitfalls That Wreck a Shadow Board System
- What to Look for When Choosing a Shadow Board Product
- Recommended Shadow Board Systems: Pros and Cons
- The Real Lesson Behind Shadow Boards
- Where to Buy Teng Tools Foam Kits and Starter Sets
- Sources
Vertical Boards vs. Shadow Foam Inserts: Which Fits Your Shop?
Vertical shadow boards are typically pegboard, sheet metal, or plywood, painted with tool outlines or fitted with pegboard hooks. They work best in fixed locations: a welding station, an assembly line cell, or a wall next to a machine that always needs the same five tools. Because they’re wall-mounted, they’re cheap, easy to see from across a room, and simple to repaint when your tool list changes.
Foam inserts, sometimes called Kaizen foam, are layered foam sheets cut so a tool sits in a custom cavity. Two-color layering (a dark base under a lighter top layer) means removing a tool leaves a bright, obvious outline behind. Because the tool is cradled rather than just hung, foam protects calibrated gauges, torque wrenches, and delicate instruments that a bare hook would bang up.
Match the format to the situation:
- Stationary bench — vertical board, painted outlines, low cost
- Tool cart — foam-lined drawers so tools don’t slide during transport
- Toolbox drawer — foam insert cut tight to each tool’s silhouette
- Instrument case — dense foam with a fitted lid to prevent crushing
What You Need: Materials, Mounting Hardware, and Accessories
Board material depends on environment. Metal backers hold up in wash bays and outdoor bays where moisture is a problem. Acrylic is lighter and works well indoors where you want a clean, painted look. Plywood is the cheapest option and easiest to drill for custom hook patterns.
Hook selection matters more than most shops realize:
- Plier hooks — wide-mouth hooks that cradle plier handles without pinching
- Spring clips — good for screwdrivers and small hand tools that need quick-release access
- Ring hooks — best for items with a hole or lanyard loop, like calipers
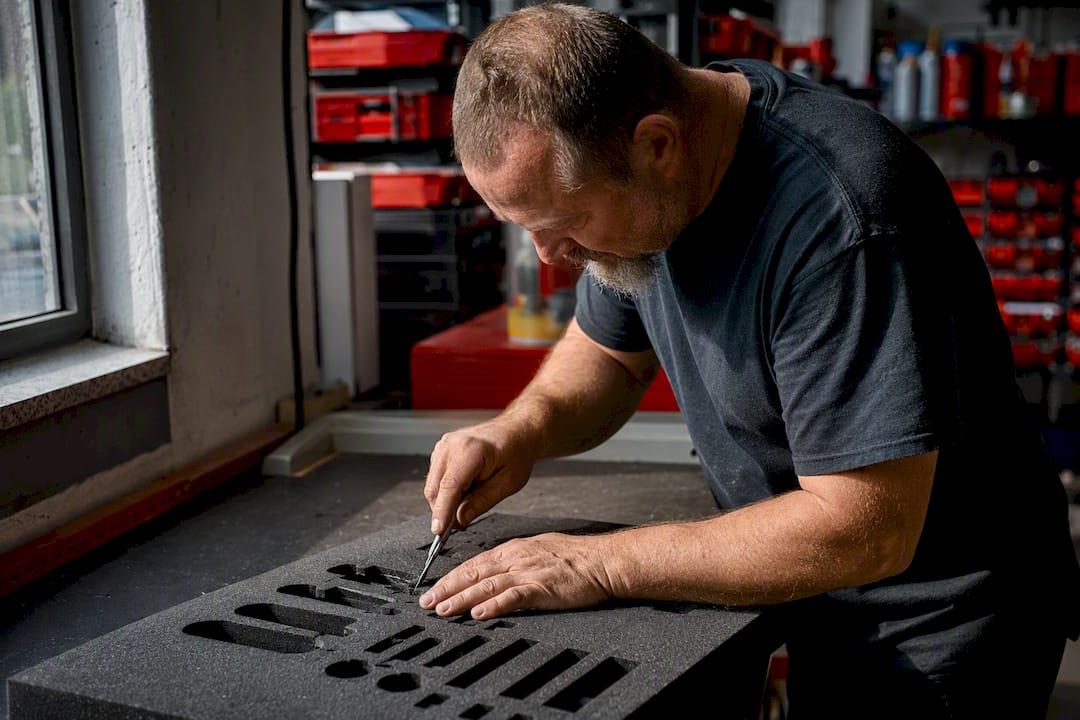
For foam, high-density Kaizen foam in a two-tone layup gives you the visual contrast that makes a missing tool pop. Cutting requires a sharp utility knife or a rotary tool for tight radii, and contact adhesive to bond layers before you carve the cavity. Label each shadow with a printed tag or vinyl decal, and color-code by tool family (sockets in blue, wrenches in red) so a new hire can restock the board without asking.
Pro Tip: Cut your foam cavity slightly undersized on the first pass, then sand or trim to fit. It’s much easier to remove foam than to add it back.
How Do You Design and Build a Shadow Board?
Start by auditing what actually belongs on the board. Don’t shadow every tool you own. Shadow the ones you reach for daily, plus anything specialized enough that a coworker might not know where it lives. The Art of Lean reference on shadow-board design puts this bluntly: select only necessary tools first, then build around that list.
- Audit your tool list. Pull every tool you’re considering for the board and sort by how often you use it. If it hasn’t moved in a month, it doesn’t need a shadow.
- Sequence the layout. Arrange tools by how you use them, not alphabetically. A brake job pulls sockets before wrenches and pliers, so lay the board out to match that motion. Leave enough spacing between shadows that gloved hands don’t fumble grabbing the wrong item.
- Create the shadows. For a vertical board, trace each tool with a marker, then paint the background one color and the outline another so a gap reads instantly. For foam, cut through the top color layer only, following the tool’s profile, then peel out the shape to expose the contrasting base layer underneath.
- Mount and validate. Bolt the board or drop the foam tray into its drawer, then run a full shift before calling it finished. Photograph the board fully loaded, every shadow filled, as your baseline reference. That photo becomes your answer key for daily checks.
Pro Tip: Build the layout with the person who’ll use it most, not just the shop supervisor. A shadow board designed with operator input around real reach and sequence gets maintained; one designed from an office chart usually doesn’t.
Vertical Board or Foam Insert: How Do You Decide?
Run through a short checklist before committing to either format:
- Frequency of use — daily-use tools favor a vertical board for instant grab-and-go access
- Mobility — anything that rides in a van or rolling cart needs a foam-lined drawer, not an open wall hook
- Fragility — calipers, torque wrenches, and gauges belong in foam, where the tool is cradled instead of hung
- Environment — dusty or wet bays favor enclosed foam trays over exposed painted boards
- Budget — vertical boards cost less upfront; foam trays cost more but need less redesign later
The trade-off is visibility against protection. A vertical board announces a missing tool from ten feet away, but it won’t stop a $200 torque wrench from getting dropped on concrete. Foam protects that same wrench but requires more upfront cutting effort, unless you buy a kit that’s already cut and shadowed for you.
Keeping the System Honest: Maintenance and Daily Checks
A shadow board only works if someone actually looks at it. Build a five-second check into the start and end of every shift: scan the board, flag any empty shadow, and don’t let a tool leave the building without someone knowing where it went. Case data from shop-floor implementations shows that shadow boards cut walking and searching time immediately after installation, but that gain erodes fast without a sustainment routine behind it.
- Run a visual check at shift start and shift end, not just once a week
- Repaint or recut outlines the same day you add or retire a tool, not “eventually”
- Treat a shadow that’s empty three shifts running as a signal to investigate, not ignore
- Fold shadow-board checks into your regular 5S audits so they don’t become a separate, forgettable task
If the same shadow keeps turning up empty, the fix usually isn’t a stricter rule. It’s often that the tool lives in the wrong spot for how the crew actually works.
Get Organized™: How Teng Tools Foam Trays Solve This
Teng Tools built its Get Organized™ foam tray system around exactly the problem this article walks through: tools need a visible home and physical protection at the same time, not one or the other. Each tray uses layered foam so a missing tool shows up as a bright gap, while the tool itself sits cradled instead of loose in a drawer.
- TELMD31 — a 31-piece mixed screwdriver set in a FOAM6X6 tray, built for anyone standardizing screwdriver storage
- FOAM4X4 general tool set (TTETQ31) — a 31-piece starter kit for small kits or a first drawer conversion
- PRO35™ cabinet kit — a 323-piece foam-organized cabinet for shops converting an entire station at once
Every Teng Tools set ships built to ISO and DIN standards and is backed by a lifetime warranty from the Fort Worth, Texas warehouse. That combination of durability and same-day availability is what makes a foam tray practical for a shop that can’t afford downtime waiting on a backordered kit.
Budgeting for a Shadow Board System
Cost scales with how much of the shop you’re converting and which format you choose. A single vertical board for one bench, using pegboard or plywood, paint, and basic hooks, typically runs cheapest since the materials are simple and the labor is a weekend project. Foam inserts cost more per drawer because the foam itself, the adhesive, and the cutting tools add up, and a mis-cut sheet means buying another one.
The bigger cost driver is scope. Shadowing one drawer of screwdrivers is a small purchase. Converting a full shop cabinet, dozens of drawers, hundreds of tools, is a real line item, which is why a pre-built kit like the PRO35 cabinet kit often beats building from raw foam sheets on cost-per-hour once you count your own labor.
Budget for three categories, not just materials:
- Materials — board stock or foam sheets, adhesive, paint, hooks, labels
- Labor — either your own time cutting and tracing, or the premium you pay for a pre-cut kit
- Ongoing upkeep — repainting outlines, recutting foam cavities, replacing worn labels as your tool list shifts
A pre-built foam tray kit shifts most of the cost into the purchase price and almost eliminates the labor line. A from-scratch vertical board shifts cost the other way: cheap materials, more of your own time. Neither is wrong. Pick based on whether your time or your budget is the tighter constraint this quarter.
Don’t skip the upkeep line. A board that looked great on day one and never gets updated is worse than no board at all, because a stale outline trains people to ignore the gaps.
Common Pitfalls That Wreck a Shadow Board System
Most shadow board failures trace back to a handful of repeatable mistakes, not bad luck. Overloading the board is the most common one: shadowing every tool in the shop instead of the ones actually used daily turns a useful visual system into wallpaper nobody checks.
Skipping operator input is the second big miss. A layout designed by a supervisor from a spreadsheet, without asking the people who use the tools where their hands naturally reach, tends to get abandoned within weeks. Designing with the operator’s actual sequence and reach in mind produces a layout people keep using instead of working around.
Inconsistent outlines cause quiet confusion. If one shadow is a marker trace and the next is a stenciled cutout, the board reads as unfinished, and unfinished boards don’t get respected. Keep the outline style, contrast, and labeling consistent across the entire board or tray.
Foam-specific pitfalls show up too. Cutting the cavity too tight makes tools hard to pull out one-handed, which slows work down instead of speeding it up. Using low-density foam that crumbles after a few months of use means recutting the whole tray sooner than planned. And skipping color contrast between the base and top foam layers erases the entire point of a foam system, since a missing tool no longer stands out.

The fix for nearly all of these is the same: build small, get input from whoever uses the station, keep the visual language consistent, and revisit the layout after the first real week of use instead of assuming day one is final.
What to Look for When Choosing a Shadow Board Product
Not every shadow board kit on the market is built the same way, so run any option through a short set of criteria before buying.
Check the foam density first. Low-density foam looks fine in a photo but tears and crumbles under repeated tool removal, especially in high-traffic drawers. High-density foam holds its shape and cavity edges for years, which matters more than the sticker price once you count replacement cycles.
Check color contrast next. A tray with two visually distinct foam layers makes a missing tool obvious from across the room. A single-color foam block with cut cavities is cheaper but far less scannable at a glance, which defeats a chunk of the point.
Check fit against your actual tool set. A generic tray cut for a “standard” wrench set won’t match your specific brand’s handle shapes or head sizes. Kits built and cut for a matched tool set, like Teng Tools’ foam trays, avoid the gap-and-rattle problem you get from forcing mismatched tools into a generic cavity.
Finally, check what happens when a tool wears out or gets replaced. Some foam systems make it easy to recut a single cavity; others force you to replace the whole tray. Ask this before you buy, not after your first tool upgrade.
Budget, mobility needs, and how much of the shop you’re converting all factor in, but density, contrast, and fit are the three that determine whether the system still works a year from now.
Recommended Shadow Board Systems: Pros and Cons
Vertical pegboard systems remain the lowest-cost entry point and the easiest to modify yourself. The tradeoff is durability. Painted outlines fade, and pegboard hooks loosen over time in high-traffic shops.
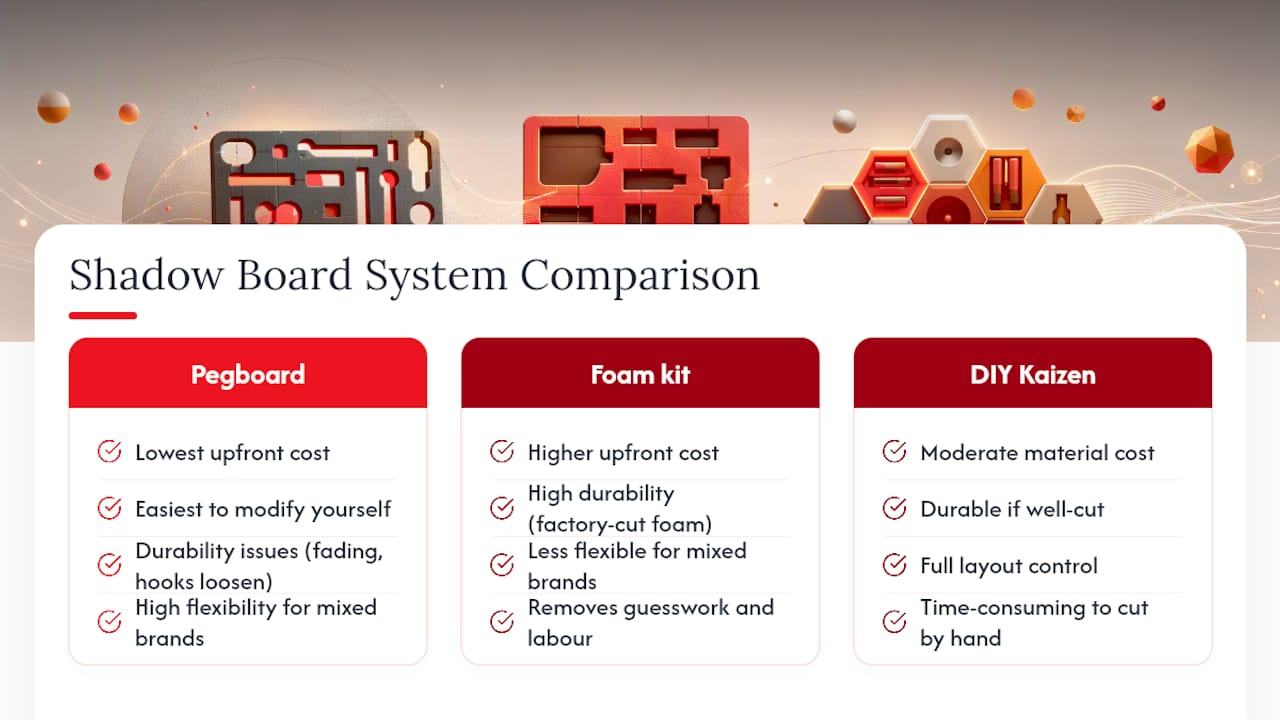
Off-the-shelf foam tray kits, like Teng Tools’ Get Organized™ line, solve the durability problem by starting with high-density foam and factory-cut cavities matched to a specific tool set. The tradeoff is upfront cost compared to a DIY plywood board, and less flexibility if you want to mix tool brands within one tray.
DIY Kaizen foam sheets purchased separately give you full control over layout and let you shadow a mixed set of tools from different brands in one tray. The tradeoff is time. Cutting a full drawer of cavities by hand takes real effort, and a bad cut means wasting a section of foam sheet.
For most shops converting a full cabinet or standardizing across multiple mechanics, a pre-built kit removes the guesswork and the labor cost. For a single custom drawer with an unusual mix of tools, cutting your own Kaizen foam still makes sense.
The Real Lesson Behind Shadow Boards
Most advice on this topic treats shadow boards as a tidiness project, something you do once and photograph for a company newsletter. That framing misses the actual value. A shadow board is a detection system. Its entire job is to make a missing tool visible before that tool becomes a lost tool, a safety incident, or a delayed job.
The overlooked part is sustainment. Case evidence on shadow board implementations shows the initial gains in search time and walking distance are real, but they decay fast without a daily check built into the routine. Most shops nail the build and skip the maintenance, which is backward.
If you’re starting from scratch, don’t overthink the format war between vertical boards and foam. Match the format to how the tool actually gets used, protect what’s fragile, keep the outlines consistent, and check the board every shift like you’d check tire pressure. Skip that habit and even the best-built board turns into wall art within a quarter.
— David
Where to Buy Teng Tools Foam Kits and Starter Sets
If you’re converting your first drawer, the FOAM4X4 general tool set gives you a ready-cut starter tray without the trial-and-error of cutting your own foam. If screwdrivers are your specific pain point, the TELMD31 screwdriver set comes shadowed and organized out of the box. For a full shop conversion, the PRO35 cabinet kit delivers 323 pieces already matched to factory-cut foam cavities, cutting out weeks of DIY layout work.
Every kit ships same-day from the Fort Worth, Texas warehouse and carries Teng Tools’ lifetime warranty, so a cracked tray or a worn cavity isn’t a problem you have to solve alone. If none of these three match your exact setup, browse the full Teng Tools USA catalog to find a foam configuration built for your tool mix. Pick the kit closest to your current drawer size and place the order today. The sooner the tray is in your cabinet, the sooner you stop hunting for tools that walked off last week.
Sources
- Shadow board — Wikipedia
- Hand tool management improvement using shadow boards — Shingijutsu Global
- Kaizen Foam – Custom Tool Shadow Boards & Drawer Organization | FastCap
- Shadow board — Art of Lean (TPS reference)